Showing posts with label tutorials. Show all posts

Saturday, June 29, 2013

Invitations at last!

I have a dream that one day my daughter will tell her friends that she's so thankful that her mother put so much work into making her birthday perfect. 

Probably won't ever happen.  But hey, I can dream can't I?

You'll be happy to know that the Great Pooh Invite Search is finally over.  But it ended in a very time-consuming, sticky conclusion.  For those of you that want to make your own special Winnie the Pooh invites that are different than everything else out there on Pinterest and Etsy, this post is for you.

After I wrote about not being able to find anything I liked for Avery's party invites, I literally went to bed and dreamt about them that night.  As soon as I woke up and got to work, I grabbed a piece of computer paper and whipped up a quick idea of what I wanted it to look like:


A hunny pot!  Not just any plain old hunny pot, but one that, when the lid is lifted, it reveals the invitations!


Hooray!!  I'm so pleased with how these turned out.  If you like them, here's how I did it...

Originally, I was going to cut out all the shapes by hand.  Such a stupid idea.  I'm incredibly blessed with parents that love me a whooooole bunch and got me a Silhouette Cameo machine for Christmas.  And I gotta say...a Silhouette Cameo is God's gift to the crafting world.  It's fantastic.  If you have a project like this that's going to take a lot of cutting, find a friend that has a Silhouette machine and see if they'll let you use it.  SO much easier than cutting everything by hand!!  Obviously, if you don't have a Silhouette, hand cutting is also an option--it's what I did with Avery's 1st birthday invites.  Not impossible, just takes longer.  So!  Let's get to it.

I found a honey pot shape on in the Silhouette store and downloaded it.  I figured out what size I needed the honey pots to be to fit into my envelopes and resized them accordingly. 

I continued doing this with other shapes until I ended up with all the shapes I needed.  When all the cutting was done, I ended up with two drips of honey, a honey pot and lid, a square for the invitation, bee wings and a body, and the word "hunny."  To ensure that I could put the invite down into the honey pot, I made sure to cut a line going across the top of the honey pot.


I made sure to pick a glue stick that would dry clear because I would be applying a whole bunch of it.  First, I attached the honey drips near the cut I made towards the top.  Then, I glued the "Hunny" words in the middle of the honey pot.  I attached the invitation I printed towards the bottom of the yellow square and then glued the lid to the top of the yellow square.  Finally, I glued the wings and the bee's body to the top of the lid and attached the RSVP information to that.

I slid the square invite into the slit at the top of the honey pot and voila!


Normally, when I have a creative idea in my brain, the finished project doesn't turn out like I envisioned it.  But this one was EXACTLY how I imagined it.  Pumped.  Best part about these?  Every invitation I found on Etsy that I halfway liked was like $3 apiece.  These invites (not counting postage or envelopes) were only 30 cents apiece.  Hooray for being cheap!
 

Wednesday, April 3, 2013

iPhone Customization--Part TWO!

Holy iPhone Customizing Batman.  Apparently, I'm not the only one who was on a desperate quest to make my iPhone screen prettier.  As of time of this post, I've had 45,768 views on my iPhone customization post ALONE.  I'm averaging like 15,000 views a day.  That blows me away, considering my little blog gets a little over a 1,000 views a week.  So, since you guys are so pumped up about making pretty icons, and I promised you a post on how to make the icons for some of the pre-downloaded apps, here it is!!

To start, I'm going to do an icon for the App Store.  This is an app that comes already downloaded on your iPhone and you cannot delete it.  The steps below are going to be for apps like that.  Ready?


Just like in my last post, go to the Cocoppa app.


Make sure you're looking at "Icons" instead of "Wallpapers" or "Stamps."


Scroll all the way down to the bottom and search icons by typing in "App Store." 


Go through all the selections and pick your favorite icon.  Click on it. 


Next screen, hit "Set up link." 


Next, you're going to assign the short-cut link for your app.  In the previous tutorial, you would search for your app that you downloaded.  Here, we're going to scroll to the bottom and hit "URL."


 Now, here's where it's going to get a little complicated.  You'll have different URL codes for different apps. These are the ones that are available so far: 

iTunes--  http://itunes.apple.com
Maps--  Maps: 
Messages--  SMS:
Music--  Music:
Photos--  Photos-redirect:
Safari--  pick website homepage (I picked www.google.com)

Enter the URL and hit "Done" at the top. 

Correction:  This is the URL for iTunes, not the App Store.  I haven't located the correct URL for the App Store, if anyone would like to post that in comments!

Next screen, you're going to name your icon whatever your little heart desires.  Then hit "OK."


A box will automatically pop up, asking you to go to Safari and add the icon to your home screen.  Click "Yes."


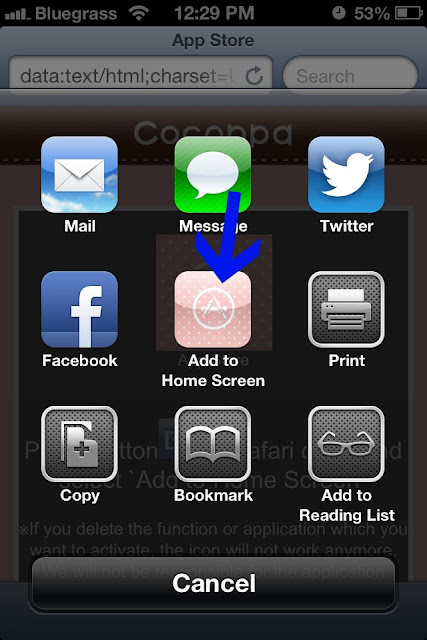
Almost done!  Hit the "share" button on the next screen.  It's near the bottom and looks like an arrow coming out of a box.  


Next screen, hit "Add to Home Screen."


Last screen, name the app--again.  Not sure why they make you do it twice.  Hit "Add."


Shaboom.  There it is. 


 Hooray pretty screens and icons!  Now, just like any other app on the market, this one has its flaws.  There are no URL codes yet for some of the other pre-downloaded apps like Phone, Calculator, Notes, Calendar, etc.  The codes I listed above are the only ones I've located.  

Also, warning numero dos.  Don't do too many of these.  Since you do have to keep your original icon (or it'll delete the app completely), it does take up memory space on your phone.  I learned the hard way that if you change all your icons to ones from Cocoppa, your phone will run crazy slow.  So I picked my favorite apps, the ones I use the absolute most, and transformed them.  I left some of the others, like App Store and iTunes, alone.  Your call though.  If you'd rather have a pretty phone that runs slower, go icon ca-razy! 

Enjoy :))) 
 
Disclaimer: I do not own the Cocoppa app. I am simply doing a review of the app and how it works on my personal phone. I am not responsible for the app or how it may work on your phone.

Wednesday, March 27, 2013

iPhone Customization...Finally!!

Youuuuu guyyyyyys.  I found the COOLEST pin on Pinterest the other night.  Seriously.  The. Coolest. 

I've been a proud iPhone owner for awhile now, switching over from an Android.  I never held any affiliation toward any specific brand of phone.  If it called, texted and Facebooked, it was good enough for me.  But y'all.  I LOVE my iPhone.  Love it.  But I don't love how I can't really customize it.  On my old phone, I could put whatever in the world I wanted on my home screens...specific pictures, photo albums, different commands (text Marty, call home, etc.)...it was 100% customizable.  I knew that my phone didn't look like a hundred other phones out there.  Then I switched to the iPhone, where everything is pretty much standard on every single phone.  UNTIL TODAY.  Y'all ready for this (cue Jock Jams music)??


To quote my favorite race car (Lighting McQueen)--KACHOW!  Omgeez.  This makes my little creative heart so, so happy.  The original pin that I found was written kind of confusingly and it took me awhile to wade through all the information and what I thought the blogger was trying to say.  So, I'm going to tempt to explain it in a MUCH easier way (I hope....)  Wanna know how to do it?  Good thing I'm a giving person...because I'm gonna share the steps!  Ready??  (WARNING:  ABOUT TO BE A PICTURE OVERLOAD)

First, go to the App store and download the app "Cocoppa."  IT'S FREE.  Yeehaw!


When you have the app downloaded and open to the home screen, it should look like this:


I'm 99.9% sure that this was originated somewhere in Asia because a lot of the apps are in an Asian language.  But don't let that scare you off.  I'm going to walk you through! 
 
First, let's tackle an easy app like Facebook.  Make sure that your screen is displaying "Icons."  You can check at the top where it reads: "Icons" "Wallpapers" and "Stamps."  "Icons" should be in dark pink if selected.


Next, scroll down all the way to the bottom.  Don't even bother going through the "search" options they offer....I think lots of things got lost in translation and everything except "Search by colors" is SUPER confusing.  I just decided on which app I wanted to search for.  So, let's search for "Facebook" icons.


On the next page, you'll see tons of icons pop up.  Choose your favorite (and that could take scrolling through several pages to decide on one) and click on it.


Once you've clicked on it, it should take you to a new screen.  Click on the banner that says "Set up link."


Next, you'll be setting up the app to go with your new icon.  In this case, when we're using an app that was downloaded from the App Store, so hit "App Search."


Now, Facebook is super popular so it pops right up first thing.  But you can also search for your app in the search bar too.  That takes a little digging.  In this case, click on the Facebook icon.


Next screen, you'll put the name of your app in the box and hit "OK."


Next, you'll want to open the link in Safari to be able to add it to your home screen.  So, hit "Yes" when the box pops up asking you to go to Safari.


After you hit yes, it will take you to a new Safari page.  You'll want to hit the "Share" button at the bottom to be able to add the icon.  It looks like a box with an arrow coming out it it.  Hit it.


Finally, a box will pop up.  Hit the icon that says "Add to Home Screen."


Name that little app whatever your heart desires.....


And voila!!  There she is, my friends.  Your pretty, new personalized icon for you to enjoy.


FYI.  You do have to keep your old icon for you to still have the actual app.  So I put all of my old icons together in a folder** (which I aptly named "Unpretties") and put on the last "page" of my home screen so I wouldn't see them.  **You can create a folder by holding one app and putting it over another.  That creates folders which can hold multiple apps at a time.  Example:


Now, this post will be one of several explaining how to make your iPhone prettier by using this app.  Use this post to download new icons for any app you've downloaded from the App Store.  But, be warned:  since Cocoppa is obviously from Asia, a lot of apps aren't available to make "prettier."  So just play around and see which apps they offer and which ones you're stuck with. 
 
In my next post, I'll explain how to make icons for some of the items that came pre-downloaded on your phone like your Music, Photos, Safari, Videos and so on. 
 
Happy customizing.....
 
 
Disclaimer:  I do not own the Cocoppa app.  I am simply doing a review of the app and how it works on my personal phone.  I am not responsible for the app or how it may work on your phone. 

Saturday, September 15, 2012

Minnie Mouse Initial Wreath

I promised you tutorials on how to make a few of the personalized items that I had included at Avery's birthday party.  I'm just not a "cookie-cutter" kind of party planner.  I'm not all for going to Wal-Mart and buying the package of coordinating plates, cups, napkins, table runners, candles, etc.  I'd rather have a handmade and from the heart kind of party.  I'm not knocking you if that's the kind of party you like to throw.  Lord knows, it's wayyyyy easier than the route I took.  But if you're like me, here's a tutorial on how to make your very own Minnie Mouse Initial Wreath.  It hung on the front door to welcome guests into the party and now is hanging proudly in Avery's room.  Ready to make one for the Minnie fan in your life?  Grab your hot glue gun and let's get started!

Materials needed:
  • Styrofoam wreath
  • 2 small Styrofoam circles
  • Black cardstock paper
  • Initial of your choice
  • Small circle sponge brush
  • Red and white acrylic paint
  • Ribbon
  • Hot glue gun
{step 1}
I started with my Styrofoam wreath and wrapped all the way around with a silk black ribbon to create the base for my wreath.
{step 2} 
After the wreath was wrapped, I took the two smaller Styrofoam circles (that had already been spray painted black) and hot glued them to the top of the wreath as Minnie's ears. 
{step 3} 
Taking the black cardstock paper (I picked glitter paper--thought it looked more "girly"), I cut out two circles that were the same size as the Styrofoam circles and hot glued them onto the front.
{step 4}
I painted my wooden letter A in cherry red to match Minnie's dress.  Of course, Minnie wouldn't be complete without her signature polka dots!  So I took a small circle sponge brush and white acrylic paint and added polka dots all over the letter.
{step 5}
I attached the letter to the wreath and made a bow out of red and white polka dotted ribbon.  It's not in the picture, but I added some leftover ribbon at the top for the wreath to hang from. 

And voila!  Avery now has her own personalized Minnie Mouse wreath.  I'm thinking about making a family sized one to go on the front door now......

Tuesday, August 28, 2012

Blog Follow How-to

Several of you have mentioned to me that you've tried to follow my blog and can't.  I'm hoping it's not a serious network issue being the reason you can't follow me.  So I'm going to do some step-by-steps to show you how to follow my blog and hopefully clear up any confusion.  Please let me know if this process STILL doesn't work for you and I'll be contacting Blogger to get it fixed (in my most authoritative, professional tone).

Alright.  First things first.  When you come to my home page, you should see a side bar on the RIGHT HAND side of my blog.  Scroll down until you see "It's okay to be a follower!"

When you click on the blue "Join this site" button, it'll take you to a screen that looks like this:

From here, you should be able to join by signing into your Google, Twitter or Yahoo accounts.  If you don't have any of these, you can create a new Google account.  You can create an account and not use it as your primary email.  I know people that created a Google account just for following their favorite blogs.  If that doesn't make you comfortable, you can always follow my blog by email.  You'll receive an email straight to your inbox every time I post a new update. 
Same as before, scroll down the bar on the right hand side until you see "Receive updates by email"  shown here:
Enter your email address and press "Submit."  Easy peasy.

If you don't want to do either one of those, there's one final option.  You can follow me on Bloglovin'.  It's a website where you can keep up with all your favorite blogs in one place.  Instead of getting a ton of emails from all of your favorite blogs individually, you can follow a bunch of them on Bloglovin' and get one email with weekly updates.  It's great.  You can read it all at once in one place.  So, if you wanna go that route, you can click here:

Now, go try it!  My goal is to get 50 followers.  Let me know if this doesn't work!

Wednesday, August 22, 2012

Minnie Mouse canvas bags how-to

It's supposed to be an "Organize One Thing Wednesday" kind of day, but  I still have that specific project on my mind and I STILL can't find the materials I need.  Maybe this is the universe telling me that I need to learn how to sew so I can just make the idea myself.  harrumph.

Instead, I'm going to be posting one of MANY tutorials from Avery's Minnie Mouse themed 1st birthday!

This week:  Minnie Mouse canvas tote favor bags!
I knew I wanted to do something a little different than the plastic-favor-bag-picked-up-at-WalMart route for Avery's little friends.  I had a couple of canvas tote bags laying around...and the idea was born! 

Materials Needed:
  • Canvas tote
  • Black, red and white fabric paint (I prefer Tulip brand)
  • Round sponge brush
  • Medium sized paint brush
  • Pencil
  • Cereal bowl
  • Small drinking glass
{step 1}
Find two rounded items to use for Minnie's head and ears to trace around.  I chose a cereal bowl and an orange juice glass.

{step 2}
Trace around items with pencil.
{step 3}
Using your medium sized paintbrush and black fabric paint, trace around each edge of the circles.  To make it easier, I squirted the paint out onto a paper plate for easier dipping.
{step 4} 
Fill in each square with the rounded sponge brush.  You could also use the regular paint brush to finish the entire Minnie head, but I found the sponge to be easier. 


{step 5} 
Add the details.  I free handed a big red Minnie Mouse bow and wrote each little girl's name on each of the bags with the white fabric paint.  But this is your bag....get creative!
Inside each bag, I added the standard party favors:  cheap, but fabulous sunglasses, Minnie Mouse bubbles, Minnie ears and a container of Puffs (for the babies).  They were a hit!  Of course, these don't have to just be for parties.  Make one for your little girl to carry to school or to use as a purse.  Or, if you're a grown-up Disney freak like me, make one for yourself!  Use it as a work bag, a diaper bag, a reusable grocery bag....the options are endless!!
Stay tuned for more Minnie Mouse party themed decorations and tutorials!!